

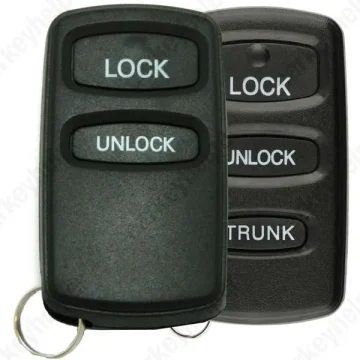
Dodge Stratus 2004 Remote
Mitsubishi Remote
Overview
Key Type
Remote
Markets
All
Frequency
313 MHz314 MHz315 MHz433 MHz
Battery
CR2032
Skill Level
Beginner
Universal Keys
G8D-522M-A, 315MHz: Xhorse ID 0548 249, KeyDiy ID R00105
Test passed
G8D-525M-A, 314MHz: Xhorse ID 0547 993, KeyDiy ID R00202
Test passed
HYQ12ABA, 314MHz: Xhorse ID 0547 737, KeyDiy ID R00450
Test passed
HYQ12BBA, 314MHz: Xhorse ID 0501 393, KeyDiy ID R00449
Test passed
G8D-525M-A, 433MHz: ID 0541 593, KeyDiy ID R03439
Test passed
MR587282, 433MHz: Xhorse ID 0529 552
Test passed
Original Keys
G8D522MA, 2+1 Buttons, 313MHz: MR587977
Direct Programming to another vehicle
G8D522MA, 2Buttons, 315MHz: MR587978
Direct Programming to another vehicle
G8D522MA, 3Buttons, 315MHz: MR587979
Direct Programming to another vehicle
G8D525MA, 2Buttons, 314MHz: MR587983
Direct Programming to another vehicle
G8D525MA, 2+1 Buttons, 314MHz: MR587982
Direct Programming to another vehicle
G8D525MA, 3Buttons, 314MHz: MR587980
Direct Programming to another vehicle
HYQ12ABA, 2Buttons, 315MHz: MR587858
Direct Programming to another vehicle
HYQ12BBA, 3+1 Buttons, 315MHz: MR587860
Direct Programming to another vehicle
433MHz, 2Buttons: MR587282 / MR301711
Direct Programming to another vehicle
Overview
Add key
Not specified
All keys lost
Not specified
Prepare dealer key
Not specified
Remote programming
Manual
All keys erased automatically
Yes
Power supply
Not specified
Additional cables required
No
Number of key slots
4
Remote Manual Programming
Remote Programming Methods
Method A
- Press and hold both the lock and unlock buttons for 4 seconds (or until the key LED flashes 4 times).
- Release both buttons and wait 1 second.
- Press and hold the lock button for 2 seconds (or until the LED flashes twice).
→ If successful, the key will flash once and/or the tester will confirm the remote has been programmed.
Method B
- Press either the lock or unlock button 3 times within 5 seconds.
Method C
- Press and hold both the lock and unlock buttons for at least 1 second.
- Release both buttons and wait 1 second.
- Press the unlock button.
Method D (Connect pins 1 and 4 on the OBD connector manually, or use a ready-made adapter such as ADC194.)
OBS: Most common procedure for separate remotes!
- With ignition OFF connect pins 1 and 4 of the OBD connector together using a suitable jumper pin (or adapter).
- Turn the ignition ON.
- Press the hazard light switch 6 times.
- Press the lock and unlock buttons alternately twice.
Method E (Connect pins 1 and 4 on the OBD connector manually, or use a ready-made adapter such as ADC194.)
- Ensure the doors lock and unlock using the key.
- With ignition OFF connect pins 1 and 4 of the OBD connector together using a suitable jumper pin.
- Within 10 seconds of connecting the jumper switch ignition from OFF to ACCESSORY 3 times within 2 seconds.
- The doors will LOCK and UNLOCK.
- PRESS the LOCK or UNLOCK button on the first remote transmitter 3 times within 10 seconds of the first press.
- The doors will LOCK and UNLOCK.
- Repeat step 5 for additional remote transmitters.
- REMOVE Jumper connection.
- Check all remote transmitters for correct operation.
NOTE : ALL remote transmitters must be programmed within 1 minute of entering the programming mode.
NOTE : Programming mode will end when 4 transmitters are programmed, Jumper is disconnected or Ignition is switched ON.
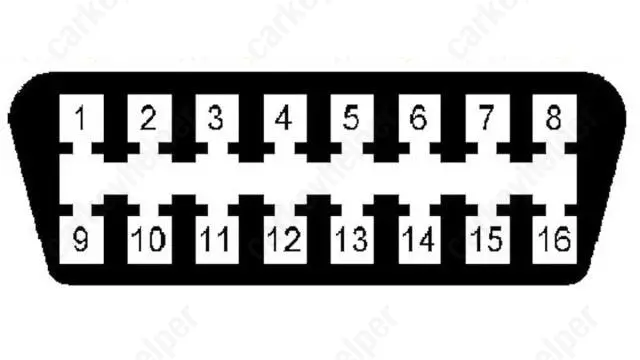
OBD Pins
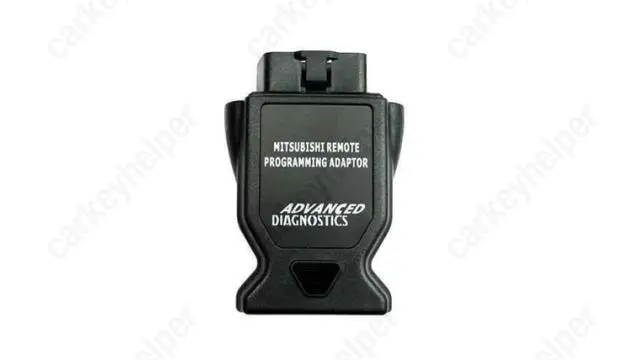
Adapter ADC194
Overview
Double locked
Not specified
Opening direction (LHD)
Not specified
Decoder capability
Not specified
Overview
Original key glued
No
Synchronizing
No